This article was originally published on the author’s personal website:https://hhming.moe/post/random-survey-gitlab-pages-ver/
Before we begin, let me explain:
The screenshot demonstration in this article uses the old version of Web IDE. The new version uses the VScode foundation (currently still in beta). Although there will be some differences, it should not be difficult for those who have used VScode to get started.
If you cannot adapt, please refer toArticles from the official blogAdjust back to the old version and consume this article.
I have written a version of Github pages before (see the message in the box above). Although I have always wanted to write a version of GitLab pages, I have never started.
It wasn’t until now half a year later that I finished writing it. In fact, the whole process ended in less than half an hour. XD I want to say that since I have changed the tool, I will write another article and earn another article.
Introduction to GitLab Pages
> GitLab pages official documentation:https://docs.gitlab.com/ee/user/project/pages/
Github has Github pages, and GitLab must also have GitLab pages! Although there are many similarities in usage and specifications between the two, they are also very different.
According to official regulations, for Github, unless you are a paid user, you must have a public repo before you can create pages; but not for GitLab, you can create pages even if you are a private repo!
From a user’s perspective, Github can create pages as long as the files are uploaded to the repo and set up to specify the directory to be used as the website; but GitLab needs to create pages through GitLab CI!
The similar part is that both use the form username.github.io/repo-name as the URL of pages. They also have free SSL certificates, open custom domain and other functions.
The troublesome thing about Github is that free users can only use the public repo. Even if you are a paid user, it does not mean that the pages created by your private repo can be made public (those who are interested in this part can read the official documents); and GitLab The trouble is that you need to be able to write the configuration file of GitLab CI (but there are many official GitLab pages sample repos. If you take a look and follow the settings, it won’t be too difficult to get started even if you don’t know how to do it at all).
There is no absolute good or bad, everything depends on your own usage conditions. Anyway, today’s protagonist is GitLab pages, let’s continue reading~
teaching
Before starting, be sure to come up with the important protagonists:
https://gitlab.com/hms5232/bird-screen-url
You can log in to the fork first, and it would be better if you give a star if you can!
Let me tell you something, GitLab has had the function of Web IDE for a long time. Personally, I have used it and found that compared to Github, only one file can be changed at a time (only the functions that can be seen on the web page, let’s not look at web vscode for now) and each file You have to commit once after editing. GitLab Web IDE is really great. If you just want to simply change something, you can do it on the website without having to pull it down to edit, commit and then push.
After the fork is completed, it depends on whether you want to clone it and make changes, or use the GitLab Web IDE that I just recommended. In short, let’s start editing! The following will use GitLab Web IDE for demonstration.
After entering GitLab Web IDE, the file is not opened by default, which is a bit like opening a new VScode. Please click public according to the numerical order in the picture to expand the folder, and then click url.js to open this file for editing.
GitLab Web IDE editing screen
Then when you see ⓷, follow the instructions to replace the URL with the URL you want to randomly assign.
If you modify the public folder name, please remember to modify .gitlab-ci.yml as well, otherwise the deployment of GitLab pages will fail!
Once the changes are almost complete, I will update the changes.
The second function list on the left of GitLab Web IDE is difference comparison. You can see what you have changed so far, which is the diff function.
The third function is commit. In fact, any changes to the content to be submitted will also be displayed here:
GitLab Web IDE submission interface
If you are interested, you can explain what has been changed in the commit message; if you are unfamiliar with git and don’t want to do it, it doesn’t matter. Just remember to change it to select the red box “Commit” before pressing the Commit button. to main branch”.
Notice! The .gitlab-ci.yml of the example repo is set so that only the default branch will trigger GitLab pages update. If you don’t want to be limited to the default branch, please remember to modify the CI settings.
After completion, a rocket icon will appear on the screen, indicating that the submission was successful.
GitLab Web IDE commit completion rocket
After returning to the repo home, you will find a two-thirds blue circle next to the commit you just made, which means that GitLab CI is executing. In this project, it means deploying your pages.
After the execution is completed, the original blue circle will turn into a green check mark, indicating that CI has been successfully completed:
GitLab CI pipeline passed
If a red cross appears, it means that GitLab CI failed, and you need to check where the error occurred. Since there are many possibilities for this situation, please find additional information to rule it out or leave a message to ask.
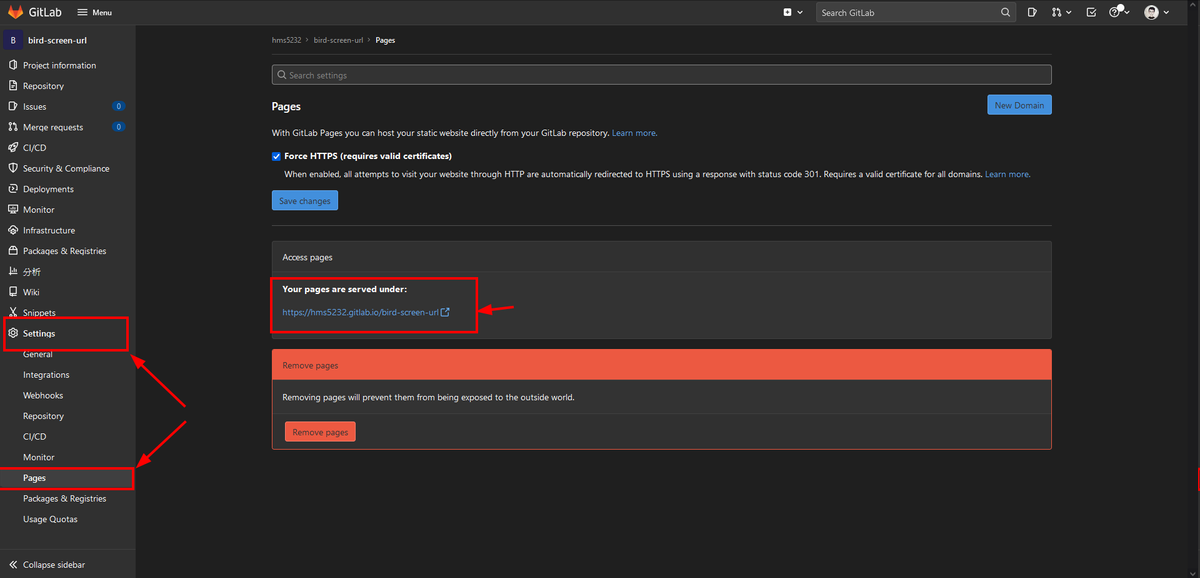
We have finally reached the last step. Now go to the Pages project set in the repo. There will be a GitLab pages URL (the default is https://username.gitlab.io/bird-screen-url). Open it and you can see it. The effect is achieved~
Pages settings and information in GitLab project settings

